Tom Gordon sent me some pictures of our skiff collaboration a few days ago with an update on what's up with it. I also will be sharing some pictures of several homebuilt skiffs that are being designed and built by their owners for their own use. Each one has a different story to go with each skiff.
Here are some shots of the plug being built. Tom is building the plug as a mold that he will build a hull from and then wet test. When satisfied with the hull he will put the infomation he has gathered into the cad lines drawings program that he has made from my original hull lines. He can then with this new info final tool the plug mold and make a perfect plug. From this he will then make the working hull mold.
Sounds complicated but it's not. The pictures that you see are a basic plywood jig set up to hold the putty that is being sprayed into this jig-form. Then the computer driven router comes over into this glob of cured putty and starts routing out to the hull lines. When done it's perfect. Of course if our thinking is not then we will just end up with another skiff.
Tom Gordon gave my hand drawn lines drawings to a navel architect by the name of Johnny Sebastion.
I love that name. We have never met. Johnny put all my lines into a cad program and faired them with this.
In doing this he could now see the displacement at any angle, with any amount of bow weight and stern weight at any draft. All this and you can see every thing in 3- D moving it about the screen.
From this you can see what the weight could be. That is what the displacement would be at such and such draft and tilted angle.
From here you have to do a hull skin analysis and get your whole hull weight list together. With a computer in the right hands this is the best way to go.
Tom has told me that they are sticking very closely to my rounded stern concept. They ended up moving my upper chine up a bit from my drawing. They have widened the hull a bit as drawn to be able to meet the Coast Guard standards for a 115 HP engine on the stern.
I figured he would do this as the hull lines I sent were to the inside of the hull skin. They have stuck to the hull sides and bottom I drew and have tweaked the aft bottom pads to their current thinking and knowledge. I can see a very intresting detail in the stern vee. Looks to me like a nice keel setup for turning at speed. They ran the stern bottom through many different programs before settling on what you see here. I'am very happy with what I see. Notice how all the hull lines flow. No hard parts or straight lines except for the lifting pads aft.
The skiff will weigh 530 lbs ready to install an engine on. With two 250 lb guys aboard with a 70 hp outboard it will draft 6.5". With the same two guys and a 115 hp motor it will draw 10".
I am looking forward very much to riding in this skiff. I feel this skiff with a 70 hp should be a great all round skiff for the anglers that want to be able to go into some rough waters and still get into the shallows.
The great thing that Tom Gordon is doing is using all of today's modern technology to make a perfect hull with out rushing and worrying about everyone else. This skiff will stand alone when done.
The next skiff here is being built by Jon Conner up in Vermont. He has built several other skiffs over the years and after reading my blog decided to design and build another new model. We have been corresponding this past year going over ideas, the pros and cons etc. of each.
He likes to build in plywood using the stitch and glue method.
With this method you are kinda stuck with a limited amount of hull shape forms. It is hard to add in chine pockets and such as you are not building over a solid building jig and molds.
But a very nice hull can be made this way in a short amount of time.
Here's Jon's skiff being stitched up, that is the 9 panels that make up the hull have been cut to shape and have been sewn together using small wire ties. When all together he will roll over and reinforce the inside of the hull with a few bulkheads to keep its shape and then Fillet and glass the inside Chines. After this is done you roll back over and fair the outside and glass this over. Then you add any spray rails or chine details on over this glassing over and final fairing the whole skiff. It looks to me he has the hull secure enough to fair and glass while still upside down. I will have to ask him about this.
Outside and upside down now. You can see Jon is trying out some reverse spray rails up forward on the bow area. He has also added a chine strake aft. We talked about this strake and it's pros and cons. Jon liked my chine pocket idea but it would have been time consuming to try and build it into the hull sides when building a stitch and glue hull. My opinion was that adding it to the outside would work but with the liability of a bit of water noise when poling if the boat is tipped back and forth the water running off the top of this external strake could make a bit of noise.
Jon felt it was worth putting in. He can always remove it. I feel when he's in a fast turn his skiff will be like on railroad tracks and will not slide much with this setup. The black bottom is carbon powder in epoxy. I personally think doing this is a waste of money. If worried about bottom friction or wear then add one more layer of 7 oz. cloth just in the areas of worst abrasion.
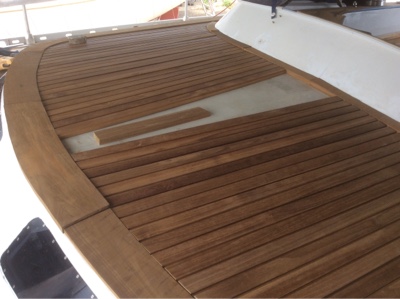
Right side up showing the aft strakes.
Nice shot showing the locker space aboard. You can see the aft chine- strake very well here. Lots of lift from this as it will catch the water going out the sides aft and gain lift from this.
Decks going together. Notice his bait well stern box transoms are vertical. He's gained all the displacement he can by doing this. Also he has no plans to use trim tabs in such a light small skiff.
Nice lines to this skiff Jon. He has been weighing it as he goes along. Will finish out under 300 lbs.
Look at the sheer on this skiff. When building a skiff on the floor like Jon did it is hard to stand back and lean over with your head upside down to get a look at your sheer. To me this sheer is fine for this boats intended purpose which is to run and fish in shallow protected waters. There's no pretense that this is going to be a rough water skiff. The flattish bottom precludes that to some degrees.
For looks an inch more in bow height might look good, But when running this bow will be up in the air at all times. When poling around it will be sitting perfectly with little windage. Jon fishing from the stern with the added bouancy of his stern boxes will support his weight well so this skiff should pole and float quite level when fishing alone.
This is Jon's very simple home made trim tilt braket. See the crank in the stern. With the stern boxes added if they are straight as the bottom in the stern they will act like trim tabs holding the bow down a bit. With this engine trim setup the motor is set back a bit so this would help counter act this. I normally
Design in a bit of upturn to the bottom of stern boxes. But with a light weight skiff, trim tabs and a biggish engine this is not needed. The skiff will just want to be out of the water when running. So that's where trim tabs help so much.
Here you can see how simple this trim plate is to make. Aluminum can be cut with simple power tools so a setup like this is very cost effective.
Jon says his skiff will be in the water soon so will post the pictures when I get them. Well done Jon !
A very energetic young man by the name of Dustin Bates has been corresponding with me as he has been making a plug and mold for a biggish flats skiff for himself and other family members to build and finish off on their own. He plans on building three skiffs from this hull design and mold. I feel he will be building more though once people see his work.
Dustin started off this hull design by building over an old hull shape that he acquired. He felt this initial shape would be a good starting point for him to add all his ideas and energy too.
When going this route you can save yourself lots of time and money if the the hull shape you have cost next to nothing and is close to what you invisioned for the final hull. But you will be stuck with a lot of its old shape to start with and this can steer your shape in directions you may not eventually want.
So think about it, draw it out before you start.
Dustin knows boat building and mold making. His last company was Barracuda Boatworks.
We have talked back and forth about details on the bottom of his skiff. My advice to him and to everyone is to keep things as simple as possible and don't make cute gimmicky details.
Dustin liked some of my idea details that I had posted a while back on reverse spray strakes, and chine details.
Let's look at what he's come up with.
Stern looking forward. Because of his initial hull shape being long and straight he has had to deal with that aspect. I would like to see some curve going in forward about midway on this chine. But as you will see it will work with his bow once seeing the whole boat.
Here it is at its forward end. Wow this should really redirect the water flow off the bottom as it goes out and aft. Can't wait to see how this looks underway.
Bow shot before final primer goes on.
Shooting on the mold gelcoat over the finished plug. It's pretty amazing that just a simple polished on coat of wax will keep this stuff from sticking. But you have to have well designed draft angle in your plug and you must let every process on the building of a mold sit for a few days to vent its gases otherwise things could stick. After having built close to 200 plugs and molds I know pretty much what can go wrong.
Nice, now let cure and then skin coat.
Plug all glassed waiting for its outer core skin and framing. See how nice and neat everything is. The fuzzy edge will be cut off and then wedges will be hammered in the sheer plate with a little bit of water squirted into it to part the mold from the plug. Such nice neat work. A Very exciting time.
If you see sloppy glass work around a builders molds its a good sign that his boats will be sloppy too.
Ah ! She's free ! Now you have to grind and trim the sheer edge. Next you go into the mold and sand the entire surface up to 600 grit to smooth out all imperfections. Then next its buffing away for hours.
For this boat size about two days worth. Then let sit and gas off. Then it's wax on wax off. Five coats. Will take two days. Then let gas off. Now you can build a hull.
Bow detail. See how long and straight the outer lower chine is. If you start with your own design then that could have a bit more curve in it. But this skiff is going to be very stable at rest. It looks like it should be very dry when running. Lots of stuff going on down there to stay dry.
The thing is with a mold like this if any of those reverse spray strakes need to be removed or shortened it's just a matter of filling in the mold and refairing.
Transom details. The little white strips are where the mold stuck to the plug fairing. No big deal.
When building the Whipray plug I used a new type of Bondo type fairing compound that was so easy to use and sand. I went through all my usual steps. When it came time to remove the mold it was stuck completely! I had to tear out the entire plug piece by piece. Luckily the plug was built in cedar strips. About 50% of the bottom had stuck. The plug was destroyed. I later learned that this new putty was giving everyone the fits. It needed days to gas off before spraying on the gelcoat.
When I got the last piece out of the mold I called Hal Chittum and said we now had a mold to start the project with.
To me there's too much going on in this transom. Like I said before I don't like cute. All those little pockets add drag and turbulence when running. I did suggest Dustin round the corners as much as possible to help with the noise.
I will keep posting Dustin's build updates as I get them. This young man needs to be followed as he is doing this whole project in his spare time on his own dollar. He must have an understanding wife.
This next project is being built by another young man that wants his own skiff to guide and fish out of. He cannot afford the current costs of flats skiffs so has taken it upon himself to design and build his own skiff. Ren emailed me a month ago asking some basic questions about foam cores and building a one off. I did not really have the time so just said give me a few weeks and I would post a blog about lofting a skiffs lines and how to set up for building. ( soon).
Ren is a man that wastes no time so these past few weeks he started on his skiff project with his vision in his head and his energy getting things done.
He is building to his own devised method.
This is the picture he sent me of his temporary plug - mold to form his foam core over. Underneath the plywood veneers are his station molds. I have not seen a sketch but I figure he has draw out his skiff on paper and has cut all his stations from this drawing. Again building on the floor is such extra hard work bending over. But I'm 57 now and when I built my first flats boat hull I did it the same way. I had energy to spare back then and I too was in a hurry to get her in the water.
Ren has temporarily laid on a light fiberglass Matt sheeting to hold his plug together.
He has now started to cover his plug with foam core by screwing down the sheets with a limited amount of screws. He intends to pull them out when he rolls over the finished glassed hull.
This is fine. There are lots of ways to hold down the core. I like finish nails as they pull out really easily with only a small hole to fill with putty.
I have never seen a skiff go together like this. But I'am very impressed by Rens energy and get her done attitude. He should be done with the outside of the hull soon.
Look at this shape. With a bit of fairing this could be the next new skiff.
Keep up the energy Ren.
This skiff I saw on Facebook on a site-group called Trick my Skiff that I follow. I don't know who's building it but a mold in the background in one of the photos looks like one of mine that I designed and built. So.... Someone please let me know.
I'am just showing this skiff to not pick it apart but to share what I see. This might help you to look at all skiff designs with a questioning mind. Please look at all what I say in the same way.
The mold just over its bow looks familiar. The " Plankton-Ultimate Skiff?"
Ok, this is a great looking skiff hull. Love that bow. The chine detail is very crisp. This skiff from here looks like it will run great with a 6 hp.
Now what I question is if it's designed to be a flats fishing skiff then with its very obvious shallow draft that very nice chine detail most likely will be very noisy as the boat hull is tipped from side to side. The sharp edge of the chine when coming out of the water will cause a small wave and dripplets that will make noise. It's to close to the surface of the water so will be coming out allot. No one fishes a boat totally flat at all times.
What a nice run. Nice curve to the hull Chines. A great skiff for small HP.
But the Chines are up too high for being quiet. If this skiff were totally flat bottomed then you would have to really lean over to get its chine out of the water. Not so with this type of bottom. Will only take a few degrees of tilt. The difference between this ever so slightly veed hull and a totally straight flat bottomed skiff in ride would only be in speed underway. And only just a bit. A totally flat bottomed skiff if leaned over by its operator and passengers to a ten degree angle would present a nice vee into an incoming chop. With a veed hull you will end up with a flat bottom when leaning over.
So I feel the dead flat bottom would give you the better ride if you knew how to run the skiff.
But this skiff looks so cool upside down. I want one! But without that stern bottom.
Classic shape here except for the stern.
The stern. I would love to hear the explanation for all of this ! I can see some things. A bit of a pocket for less drag when on plane. The steps can act like a keel when turning. BUT ! When turning if this skiff leans just a bit they will not be grabbing but wll be in the air doing nothing. That rounded keel sould have a sharpe edge to it to grip the water in a turn.
All this will add drag when poling. I would like to know how this skiffs turns out.
It should plane out with a 15 hp if built in the 250-300 lb range at about 18 knts.
I sure like its lines but want to know if all that stern bottom stuff works.
It's back to cute stuff. Is it really worth it? We'll see. But I would love to have a hull like this with a clean run to the stern, solid glass bottom with cored sides. Nice all round nock about skiff for low hp.
This Last skiff was built by a Bahamain in the Abacos of a Hells Bay Skiff. There are lots of HB skiffs over there fishing the Marls. This photo was sent to me by Oliver White. Thanks Oliver.
When I next sail back home to the Bahamas next summer I will look up this Bahamain and give him hull lines drawings to work from for his next build.
A few skiffs out there being built. Lots of the skiffs today will look very similar but in reality they will all be different as its all in the details that will separate them all. Some will be be real yachts done to perfection but all will float and get you out to the same spot looking at the same fish. Remember this.
I live aboard my own self designed and home built plywood sailboat that is moored in the same anchorages as the wealthiest people in the world with their perfect yachts. We go to the same reasturants, shop in the same stores, drink side by side in the same bars, breath the same air and swim in the same sea. Are they having more fun than me? Do they see the same sunsets differently? Probably not. The difference is they drink more expensive Rum than I do.
Start building your own skiff, yes it will take a bit of time out of your life. Give up your time on the Internet and you will have plenty left to get building. Think of the satisfaction of catching fish out of your own self built skiff.
The Hogfish Maximus is a very unusual looking boat. But because I built it myself and sail about the oceans in it I get more job offers than I can take to help others with their store bought boats.
Let's get going!