It’s worth taking note that Brian Floyd and his current 10 Weight and 8 Weight skiff builds has incorporated his lifetime of repairing skiffs to build his skiffs in such a way to never have to deal with the issues seen here. One example is all his fuel tanks can be easily removed through the forward hatch if it ever leaks. Today finds me prof reading this on Hornby island BC with our first day of light rain in months, winter is coming.
 Charley Causey dropping by Isla Marine a few days ago to say hi. Charley was my first Fkats skiff client in 1983. I built 3 skiffs for him over the years and he has owned 4 of my designs since.


 This is a newly refinished Super Skiff that I originally built for Sandy Moret. It’s been through the ringer but has a new owner that’s done a fantastic job of bringing her back.


An nice picture of Larry Littrell steering his old WATERMAN skiff. This is the skiff that had the add on side decks. The joints of these side decks over time would have cracks at the joints that are cosmetic.


 The bow of a WATERMAN SKIFF showing its bow lights and nice smooth radiused core all glassed in nicely. The lights will eventually leak and fail but they can be replaced as they are accessible.


 Side view drawing of this construction setup.


Voila


Looks alright here.


Hal Chittum and I at the Miami boat show this year. When I design skiffs I use Hal's size as my guideline as a typical American. I am greatfull for my height and size.


 Old school Simple Super Skiff finger hatch lift. Not Bligh enough for todays guys.


 Now here's a recent picture of Flip Pallot in the revised MARQUESA skiff design built for Flip.

Looking great Flip and the crew at HB.


 Here you can see the HPX / Chittum 18 skiff hulls compared to my Piranha 18 skiff hull.

 Just look at the scum lines on the above skiffs for comparison
 While in Islamorada I got to see a bunch of my old fishing guide friends.
 Billy Knowles and I next to the Lithium skiff hull mold. Billy’s got a better tan than me.
 John Donnel.
 Steve Huff and I go way back.
Being in the Florida Keys anchored in Islamorada I get to see lots of flats skiffs. Islamorada can be called the flats skiff capital of the world for the sheer number of Guides fishing out of here.
As a designer-builder-repair-modify guy I get to see lots of my past skiffs and others designs and builds when here in Islamorada and online.
Today we will look back at my earliest skiff designs and builds all the way to the present. This blog is to give a bit of a back story to my past builds with the thinking of what worked with how details have improved over time. I will also show how the details of how others newer skiffs are going in different directions to suit the market, the builders and salesmen of these craft.
Because I am anchored in Islamorada in the Florida Keys I will be looking at just a small sampling of the skiffs being built today. The predominate skiffs being used by professional fly fishing Guides today are the Maverick line of skiffs, the Super Skiffs, Hells Bays skiffs with just a sprinkling of other brands like Beavertail and a couple of Chittium skiffs.
The majority of skiffs being Maverick, then Hells Bay, Super Skiffs and on down. In Islamorada they are about even in Numbers but go down to Key West and the Mavericks I think are the most preferred.
For the Tarpon anchor in the channel with bait crowd there are tons of Action Crafts fitting not this market quite well. Very stable craft, dry running, lots of room so they work well. But I would not want to pole one of these around much.
The good part of this list of skiffs is that the manufactures claim to be building the best in the market so it's always nice to start at the top and have a look to see what's happening.
In my early years of building one off skiffs, plugs and molds I learned a bunch of details by looking at what had been built in the past , how it held up and by repairing others projects.
When I started building light weight skiffs in Islamorada and then in Tavernier at my shop BACK BAY BOATS in the early eighties I used good quailty resin and basic hand laid up work. The earliest thing I noticed was a slight print through on the radiused corners of my one off console fiber glass work. What was happening was that I used 7oz. Glass cloth to cover my corners and in my deck layup builds. Because I glassed in multiple light layers and faired over this very quickly the glass had not had the time to cure properly and shrink to its fullest. What I could see but nobody else was a very slight print of the 7oz. Glass cloth coming through at the radiused corners of my deck builds. The fairing putty was being exposed as the cloth shrank in the heat of the sun. This was barely perceptible but to me it just glared out at me. I quickly learned about post curing my builds by exposing the finished glassed and faired skiff to a few days in the sun to get it all to shrink and cure. Then when I finished fairing and priming all was well. This early knowledge has stood me well over the years.
When I first started building skiffs the typical hatch in a skiff was there mostly to keep you from stepping into the locker. No hatches were built to keep water out. My first attempts at trying to help remedy this was to design and build deep hatch gutters and drains. On my hatch edges I glues a small 3/16" string around the under edge to help as a drip edge. From this crude design I went on to building proper deep hatch edges as you see today.
In the eighties a typical HEWES skiff would have wood stringers glassed in place with a carpeted plywood floor. I built all my stringers out of glassed over core. This was tedious back breaking work.
To secure my cored floor to the stringers I developed a system of several ways from glassing in a wood strip on to the top of these to a bolted aluminum angle on the top edge and then screwing into the angle through the floor. All worked well. I made a boxed stringer when I built Carl Navarees skiff which is close to the standard of today's thinking.
My first skiffs had glued on decks. I used 52-100 back then. My thinking was that it would be nice to at least have a chance of removing the deck cap if something went wrong. In hindsight the only thing that went wrong was the aluminum tanks leaking eventually. I built mostly fiberglass tanks then and none have failed to date. The aluminum tanks lasted about 25 or so years. Eventually I started glassing and bonding the complete skiff deck and interior together to form what is known today as monoque build. None of my skiff hulls from my Back Bay Boats era have failed or had any problems except at times indifferent up keep from various owners. Those that still own the original skiffs look as good today as when they slid out the shop door.
It was a good period in my life as I had tons of energy, lots of ideas and great clients.
I will give a look over here of the last Super Skiff hull I bulit in 1986 for Charley Causey using their mold. It was the last skiff I built before selling our business property in Key Largo called BACK BAY BOATS in 1988.
Today Capt. Craig Brewer owns this skiff and has hired me to bring her back to life. This I will do this summer and post the blog about her when finished.
Here is the hatch edges as they look today. The fact is all skiffs, boats and yachts take maintence.
There is no panacea of because I paid for it it will take care of itself. Just look at the finger pull corners and the hatch flanges. The crack along the top edge is cosmetic probably started with the flange that someone added to hold down the cushion flaps. Just some glue and paint and it will be like new.
Back then I liked to cut my hatch gutters edges where the hatches sat down to the minimum to have the openings as large as possible. You can see the groove lines in the bottom of this hatch. These hatches fit quite well and did not make noise because they laid evenly on that edge.
When I first looked at flats skiffs the norm was for the hatches to just drain into the lockers and the bilge. Or they would have a drain tube made from a 1/4" copper tubing. One fish scale and it was plugged. Look at the Challanger skiffs for this detail. Well I think all those skiffs have been upgraded by now.
I started using the 1" brass drain sleeves and glassed them to the underside of the hatch gutter drain.
You can see the hole in the hull below where a through hull went in. This locker was to be a Bonefish live well as back then you could bring the fish in for tournaments.
This is the stern bait well. The little notch in the stern is for the steering cable arm to move back and forth into. If I made the well bigger you would not have room for the bait well. Everything is all glassed in place using 7oz. Cloth and then faired over. This skiff looks like crap now but all it needs is sanding,
Some filler, a good primer coat and then a finish coat. I have no idea what they were doing grinding all that edge off.
Here you can see the aft hatch and the edge seam showing. The lip is still strong with no movement. It's just this seam which needs filler and new paint.
You can see the original grey deck then the primer I painted on and the peeling blue finish coat.
Some guys just never take care of their skiffs. This is one of them.
Here you can see the starboard rod tubes. The two upper ones were for water for the bonefish well no the fuel line. The sheer is glassed In place and the bulkhead is bonded to the deck with a radiused putty from the inside. The yellow roving cloth is 18oz. KEVLAR. The bulkheads are tabbed in with 1-1/2 oz. Matt.
Rod racks glassed in with biaxel cloth which I don't like. But back then it was new on the market and I was given a roll for free to try out. It's held this skiff together quite well.
Close up of the glass work. The cloth under the deck is 10oz. Cloth. It's dried out over time as the rest of the exposed fiberglass work. Today I would coat with gelcoat or a good paint to protect. Back then it was all about saving weight.
Aft cockpit drain detail. This goes into the stern well and also the inner hull. I would not do this today.
It had a brass sleeve going into a right angle PVC pipe that went to the aft well. It's gone now. Today I don't want any hidden parts that can't ever be rached again.
Console rigging hole. There is a chase going aft so this all worked out well. KEVLAR roving is on the inside of this hull because this skiffs bottom is solid, no core.
This picture shows the inside of what was my built in fiberglass fuel tank. You can see the thickness of the glass edge of the laid up tank. I have no idea why someone has cut it open. But we get to see that after 30 plus years the glass is still in near perfect shape. The brown core can be seen. It is in like new shape even exposed to the sun. The white is the radiused putty fairing for the bulkheads glass work.
All is solid as ever.
Look at the tank top section here. The lid was put in place and then the top was completely glassed over. The hole is for the tank vent fitting.
These tanks really worked well.
If I was building my own home built skiff I would build in glass for sure.
Sandy Morets Super Skiff I built in 1984.
THE HELLS BAY BOATWORKS YEARS,
being pretty much a loner when it comes to building I have at times worked with crews. 2 years in the USVI building big wood epoxy multihulls. Skiffs in the Bahamas and at HB.
I will break down the HB years by my time there 1997-2002.
Then Hal Chittum and Tom Gordon running the shop,
Onto Brian Brodrerick, Hal Chittum and finally to the present of Chris and Wendy Petterson.
The first thing I had to deal with at HB was to let go of wanting to do everything myself. I am a detail guy and I know what my strengths and weaknesses are. Over time I got a great crew together that eventually understood my building ideas and methods. This took time.
To get the quailty of the skiffs out during this period of HB history I was the first person in the shop and the last one to leave. Every day I directed my team leaders like Tom Gordon and Scott Empson to what could and needed to be done for the day. From Hull#1- 324 you can ask me about them. I was there.
After these hull #s you will then have to ask Hal,Tom,Brian,and now the Pettersons. The building methods, standards changed after I sold out and left the shop.
Not all was easy during my time there. Following are a few of the things that happened when building lots of skiffs with a large crew of 30 + people.
Getting riggers to learn how to properly install hardware without drilling holes all through the decks and hulls of the skiffs. It was bad at times with a full time patch person dealing with this problem.
Getting good suppliers to back up their products. I laid up Mikel Swardlows skiff hull. The next day we were supposed to pull it out of the mold. The cured glass just did not feel right to my touch. It was hard but not the way I felt it should feel. I bought a Barcole hardner tester and sure enough it was not testing out per the specs. I called the resign company up and told them what was up. They sent me Geneo Baker as their rep. Geneo and I went over all our procedures. Sure enough I was right and they said I was 1 of only 2 other shops that had noticed this batch of resign. They repaid the cost of the skiff hull and all the resin in the shop. The dark blue skiff that was our sign at the First HELLS BAY shop was half of this skiff that just did not feel right to me.
Gelcoat !!!!!! I got my crew to keep meticulous records of all the gel times, shop tempts and so on of all our builds So I was able to show the gelcoat manufacturers that their gelcoat was inferior and that we were using it properly. This occurred when a customer would come back with all his hatches a different color from the rest of his green deck. They would deny their product was at fault till they came in and saw our records. Then they would replace all our costs.
Leaks in the compartments. This issue will go on forever. I am trying to get it down to an operator issue. At times in the past it was the owners fault. Figuring this out was always a project. One client was trimming his bow down so far that the bow running light wire was siphoning water aft into the rear locker. This took many hour over time to figure this out.
On several occasions when taking possible clients out for test rides I would get a new skiff and head to the launch site being told the skiff was ready to go by the rigging shop. Once trying to impress the possible buyers with how easy the skiff would slide off the trailer was impossible because one of the riggers had screwed right through the hull into the bunk boards of the trailer.
I forgot once to check if the crew had put the stern plugs in before a test ride. It was a short one once I realized we were sinking.
Gas in the tank...yes...nope.
Getting a rigging crew to pay attention was a challenge. I was so busy back then I had to rely on them but always checking.
This is a Hells Bay skiff with a slight gelcoat crack on its aft hatch outer aft radius. From what I have been told this slight crack shows up in some of my old waterman skiffs aft hatches. Today I would make sure extra 7oz. Fiberglass Cloth would be laid up in this area and radiused out to prevent this on the top skin layer.
The deck is too strong to break but this is called a stress crack and is cosmetic. It can not be fixed unless reinforced from below and the deck ground out and then faired and the whole deck repainted.
Sometimes these cracks show up because of the deck being stressed when coming out of the mold.
Sometimes the mold has stress cracks in it and it transfers these crack to the new parts.
A crack in a WATERMAN SKIFF that has been run very hard. It's not structural but it does not look good.
Looking back I should never have gone this way. We were trying to sell a price point skiff but everyone wanted a top end skiff but at no cost. By the time we came out with a one piece deck for the WATERMAN we had extra options for all kinds of parts.
In today's skiff market these hatch locks are all the rage. I hate them. Why?
They leak, add weight and are changing hatch drain designs for the worse. Hatch drain gutters have now doubled in size to try and catch the leaks of these bling items. What happened to just poking your finger in a hatch corner or using a small carriage bolt lift up the hatch. As a rigger you have to get into these lockers to rig and maintain your skiff. The openings are getting smaller for this not really needed hardware.
See the width of this hatch channel to accommodate this hatch lock-lift that will leak, rust and fail. Look at how shallow the gutter edge is on the inside part. All that detail and it's going to be a wet locker anyway on this current model HB.
Here’s a HB skiff that has a phenolic insert in its deck. This detail was not done during my time. The Phenolic is too hard and the rest f the glass part shrinks and it doesn’t so it stands proud over time.
This HB tank was installed after my time at HB. I designed the fuel tanks to be removable and to stand proud of all the fiberglass hull sections. After I left HB started just glueing in the tanks with 52-100 as seen here. A great way to catch moisture to lead to corrosive leaks. “ Larry” and the shop Forman should be re-educated.
Old school WATERMAN hatch. See how long and deep the hatch edge is. The channel has to be wide enough to let this hatch edge swing up. The side and front edges can be angled downward and be quite deep as they just swing up.
See the aft channel how it slopes downward. That is the way to go to get the water shedding.
This hatch lip could have been longer and deeper. Shop Forman should be watching the crew to make sure they don’t cut the flanges too short.
This is my idea of a new hinge design to have the turning axis farther inboard to allow the hatch lip to be quite deep and still lift out of the gutter.
Today lots of skiffs have issues of water getting through the hull to deck joint. Lots of the problems with this is just bad habits of not thinking of the caulk line. That is by going back and forth if squeezed out it will allow water to get between the caulk lines. Best way is to lay a gasket along the whole sheer edge and caulk length ways back and forth. This sheer detail is I feel the best way to have a watertight deck today.
Now let's look at the CHITTUM SKIFFS.
I have been doing some bid job work for Isla Marine in Islamorada lately. My first 3 jobs were to replace the Chittum Islamorada 18 stern wells with new drains systems. I basically bid on tearing out the 5 year old stern wells and building new shallower ones in place as the owners have requested.
Here is a CHITTUM 18 built with epoxy resin with a deck waffle that reminds one of an old wash board road or being at the low tide area of a beach. This newish 6 year old skiff is getting a new stern well system, and because the fuel tank is leaking a new fuel system too. To do this the old tank has to be cut out from the deck and the entire deck non skid has to be repainted.
This deck waffle look was caused by several factors.
When infusing and building this deck part the resin was not cured and mixed properly so it post cured causing the resin to shrink at too fast a rate which crushed the core and caused the ridges. The ridges are just the cured resin sticking up along the cores kerf lines because this skiff was resin infused under lots of pressure. This means that all the core kerfs are filled with resin, they hardened very quickly and very hard while the bi-directional glass cloth shrank and each area worked off each other and squeezed the core down a bit to form the valleys. It's easy to see the different wedge shaped core piece along the sheer edge going in a different direction. To fix this the builder could have just sanded off the painted on non skid and then faired the deck out between the ridges. You would not want to try and sand the ridges down as then you would end up with a thinner deck skin laminate. The added fairing putty would not weigh much but just take up labor time out of pocket.
The builder told the owner it was caused by barometric pressure and the buyer accepted this explanation.
Ah... When you are infusing a deck part it's under huge pressure.
As a builder I can't imagine having taken the time to have painted these parts looking like this from the start. When Chittum Skiffs were building these all Epoxy skiffs they were going through a huge learning curve being new boat builders and building with materials and methods unknown to them at the time.
This deck as all their parts at the time were pulled from the molds being perfectly clear to see through the resin skin coat as they could not use polyester gelcoat. This means you could see all imperfections in your laminate in the way of air bubbles, voids and such. When I was shown a set of parts when they were located in St. Augustine Florida they looked like a nightmare of future cosmetic warranty work with all the air and voids to be seen.
The fact is as the builder and seller of a product you will always be the one that will be called out as to any flaws in your product. Even if you outsourced the parts from a sub contractor.
It's always your fault, not your employees.
This look in the industry is most builders nightmare. Back in the day when epoxy was being first used in building one-off boats no one knew that this would happen when their hulls were exposed to direct sunlight, or if the epoxy resins were not mixed and post cured in the shop properly. Epoxy resins have to be mixed exactly with NO MARGIN OF ERROR in measured or weighted quantities.
Is this a weak deck? No not for a small skiff.
When I built my last 32’ build in all epoxy It was placed in an insulated oven built around it to cure in. It took 10 hours to bring the heated oven structure up to 120 degrees and then kept at that level for 2 more hours, then slowly letting it cool down. The boat was painted bright Red and has no print through sitting in the sun in Antigua for the past 4 years.
As I explained earlier about my own dealings with print through its a learning process.
You can post cure your epoxy skiff and parts by just laying a big black plastic sheet over them out in the sun for a day. This will heat the parts up to well over 120-180 degrees. You do this when your skiff is in the primer stage. That way you can fair again if needed before the final finish coat is applied. This is the low tech way for backyard builders or to make sure your part is cured before moving on.
The right brand and type of epoxy resin is nice to work with because of the no styrene smells and it's added strength. But you have to be very accurate when working with it to get flawless results.
And you need sunlight and not trying to do this in the winter up north or you will need to build an oven.
Here we are looking down into the Chittum stern splash wells. This small well idea was a design concept from Flip Pallot back at the beginning of Hells Bay Boatworks. To me if done and used properly it is a great system. But there are details to building it properly and especially using it right that I will try and explain here.
First off the Chittum wells shown here had nothing wrong with how they were designed to work. The owners just wanted a different system to simplify the bailing of the water from their skiff and for me to find out why its bilge was always filling up with sea water to the point of almost sinking every time the skiff was launched.
What will be shown is the behind the scene of how they were built and how to get the details right for future builds and builders.
First off for me it's all about maintaining a skiff in the future from when it was built. MANY builders do not think, consider or Care about after sales work or maintenance. To get this angle off I had to cut it off with a saws awl. Then I could cut and remove the plastic thru hull. I wish the designer and owners of this company had to try and do this once. Once caulked in place it's impossible to remove unless maybe if it was a bronze thru hull.
My job was to cut away the deep sump and build and install a new shallow sump. Here you can see all the leaves that are now exposed once I have cut out the water channel to the stern.The problem here is the drain channels is big enough but the drain hole to the stern are a 10th the size. This is a new skiff, just think of what crap is going to go in there over time. Good design concept but very poor execution in the details of making it work.
Now you can see the side of this deep well looking aft and what is hidden till now. That's the bait well drain going out through the transom. The hose and its 2 rusted hose clamps were hidden alongside this well. It's obvious that this system was installed before the deck was glued in place. The hose clamps are almost rusted through. The ones that are attached at the through hull are glued in place with a huge glob of bonding putty covering the hose clamp nut to unscrew. The worst part is the slot for a screw driver is hidden and pointing sideways from its easy installation before the well and deck were lowered and glued in place. Absolutely impossible to maintain ever. This means this skiff would in maybe another year be taking on water indefinitely or sinking out right. To fix any part of this the designer and builder-owners expect you to do all this through an incredibly small hatch. I would love to watch them put on a new hose clamp. Absolutely impossible. This is where the salt water was entering the skiff because the hose clamps were wearing out and loose. Now this is the most expensive skiff on the market today. The hose clamps used are the ones that are not all Stainless steel. At least they should be top end hose clamps if expected to live there for the life of the skiff.
Now the bottom of the well is gone. Lots of bonding putty here. About a gallons worth just on the bottom. You can just see the putty glob sticking and hiding the hose clamps to the through hull.
The stern area is total putty filling in the 3/4" gap between the stern core and the well aft which means not so great initial tooling when building the plugs and molds.
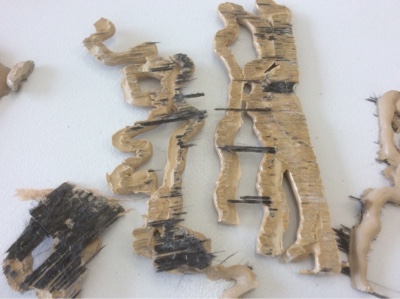
This picture shows another CHITTUM transom exposed with half the aft well back removed. Once cut it was very easy to peel off this glass. That's because it was barely bonded to the well aft side. The black is the carbon biaxel cloth. The stringy strips are the biaxel cloth stripping away from the well skin.
That's why I don't like biaxel cloth much because under stress it just peels and shatters. Not for my designs.
Kind of looks like a TIM BURTON movie Pastry. Three different types of bonding sealing putty here. This was an earlier hull build by a year.
Even on this skiff the leaves got all the way under this stern well bottom. Just think of what's going to be there in your skiff with all its built in hidden liners. Look at all the bonding putty that never bonded.
All out. See all the CARBON FIBER strips. The cloth was very resin dry so it was failing easily. All I needed was a chisel to remove everything.
Stern all cleaned up and new water box built. The box was built in a plastic storage bin. Just wax, add gelcoat, let cure then glass up. Then cut and fit to boat. All was glassed and filleted in place using epoxy resin as these are epoxy skiffs.
Now you can at least see the thru hull and its hose clamps and if you are an Octopus you might be able to reach in through the aft hatch to maintain those hose clamps.
The new shallower well bottom ready to go in.
Can you imagine doing all your maintence to your $70,000.00 skiff through this small hatch?
New well box with lid off installed.
DONT DO THIS ! this gas cap was installed to slip a trolling motor cable to the forward battery on this Chittum skiff. ALWAYS REMOVE THE LABLE!
The brown line is how much gas was put in the bow locker before they realized what was happening.
This is the opening to the Chittum skiffs soft fuel tank. In theory I've heard you are supposed to suck this tank back out with a Vacume cleaner. But the tank is supported by hard foam strips when empty. Was impossible to remove through this small hole.
Now you can see it after the deck has been cut away for access.
Not looking good here. In my time on the water I have heard horror stories of bladder tanks and so on. I have always stayed away from these kinds of contraptions. This hole was made even though the tank lay in a rubber barrier from the raw fiberglass.
Fuel tank removed and hull letting the gas in its skin evaporate. The brown in the core is gas intrusion.
New fuel tank going back in. If this tank leaks it will have to come out the same way as it went in because the bow hatch is too small to remove its tanks. This means another very expensive deck repaint job.
A bow tank leaked too on another hull and here's its new tank going in.
This is how I like my tanks to be installed.
See the hatch edge poking up. That's what I don't like about crowned decks. Everything has to be perfect all the time or you get this look. On a $70,000.00 skiff it has to be perfect all the time.
When wanting to know when your skiff was built you just look on the starboard transom corner to look up the HIN number.
From right to left this CHITTUM skiff was built in 2011, the L stands for the Month of December, and this hull is # 13. The CSL is the company name which might stand for Chittum,Sawley,Limited
The CHITTUM skiffs are having leaks in their trim tab installations. Trim tabs that have no bent edges I feel twist a bit which put pressure on the attachment points on the hull. These bolts have been in several Times to try and stop the leaking. I would have just glassed them over on the inside to start with.
But as you will see not all the fasteners are open to be able to maintain. The trim tabs are installed later in the build instead of at the beginning so the inner fastenings have to be screws which are going in behind the bulkhead here which is not accessible from the other side.
See they are caulked over here but they will continue to leak as the trim tabs will continue to flex. Best to install like I have drawn in the next picture from the beginning.
If the trim tabs are installed at the beginning of the hull build then you can wax the bolts, drill and tap into place and then glass over the holes. You could build in place with regular nuts and still glass over and these bolts will always be removable.
Or just design the skiffs aft interior to be accessible to bolt the tabs in place after the hull and deck is built.
The cracks you see here are secondary bonding cracks from the floor sitting into the drain system that is installed here. Very elaborate but TOTALLY USELESS unless you have ample drainage. Why have a big large drain leading to a constricted end drainage area that is NOT accessible to clear out?
A big ole bump in the gutter system to accommodate those stupid hatch latches. All Chittum and other skiffs that have these are always having them recaulked because they have an 1/8" bonding caulking lip area.
Terrible. See the big bubble. That's because it's very hard to infuse Biaxel glass cloth into very sharp radiuses. These radiuses should be softer.
I show and point out this drainage design system here to give my opinion and observations to this design. First off what ever happend to bailing a boat with side plugs out through the cockpit side? Well
When your skiff is loaded up they are under water by today's skiff designs and loads.
Now the idea here is intresting but it's way over done for a 500 lb skiff. The fiberglass drain receiving box is there to replace a 1" right angle drain pipe. That's good because more water can be flushed out.
But the problem is all that built in carbon and all the work in tooling and fuss and it still all leads to a 3/4" venting draining hole that is being plugged with debris that cannot be removed because of the rear design if using the deep well design. This one here has the big opening it needs.
Remember. Carbon is 10 % lighter than fiberglass cloth and 30% stronger. But why spend so much on a drain tube? It is not adding any structural strength to this design at all because it's just bonded with glue to stop it from leaking. If the glue line cracks where it is hidden under the bait well you will have a forever built in leak. All it is is a drain system.
Don't look at the carbon stringers and placement being out of line.
Beware of the man and his air pressurized putty gun.
Don't forget to drill drain holes in those stringers to be able to get rid of the water that finds it way in under the cockpit floor. Otherwise it will be like past skiffs having to have the cockpit floor cut open to drill out.
The bow of the Chittum skiff with the fuel tank removed. The Coreing is all laid in place without any smooth edges. This means when Vacume Infused the Biaxel cloths have to be forced over these sharp angled edges. In the industry of building top end boats this is a NO NO.
but I see it in the MAVERICKS skiffs too and many other brands.
It's just being quick to build and get it out the door. No one will notice.
I did.
Sharpe edges, the poured foam was there to hold the fuel tank in which might have helped it corrorde and leak.
Sketch of what core edges should look like if building to the highest standards.
This is the fuel vent going out the hull side. Installed before the deck was installed. Vent was installed backwards so it was prone to catching saltwater. Inaccessible forever unless cutting deck off to replace hose and hose clamps. This is why all skiff hardware should be accessible after the skiff is assembled and built.
One of the problems with spray rails that have deep angles is how to drain water that gets init from the sheer and many other places. It's impossible to drain this type of spray rail as the end does not enter into the skiff hull design at its aft edge. On others if some water is there simply roll the skiff from side to side and it will drain to the middle of the skiff. Here a foam stringer is being used to try and fill in this area. Today the area is filled with poured in expanding foam to the sheer level. This foam will eventually absorb water as it's not closed cell and will add weight to the skiff over time.
This is the hole that had to be cut in the deck to remove the leaking fuel tank. Because the fuel tank was behind a bulkhead it could not be cut out from the hatch. It's all glassed back in now. The next thing to do is sand all the non skid off and repaint the entire deck.
Forward tank deck going back in.
This is the inside of a home built class 40' ocean racing sailboat I got to go aboard last year in Antigua just a few minutes after the 2 guys had crossed the Atlantic in her from their home port of Spain.
I show this build here to illustrate and help you understand that there is a higher level of building craft which just takes a bit more concern for the details. The rules for this ocean racing craft are that no Carbon Fiber can be used to keep the costs down.
This boats was built by hand using Vacume bagging where needed. Look at the detail and finish.
These are pump hoses to fill the water ballast tanks.
The engine cover is removed. See the finish.
Here she is outside. Another world of boating for sure. This is the world I live in when I'am out sailing.
I raced against this vessel in the RORC 600 and we lost to them by just a bit but beat all others.
The sailboat I raced on was built just like this but in all Carbon. It's totally black inside so no pictures.
I will end my Chittum skiff observations here with a picture of me redoing these stern wells.
Now a few observations of the early Maverick HPX skiffs. This shows that print through can show up in resin infused hulls that use a resin blend. Building in polyester resin is risky because of its faster gel times.
What you see here is the core edges that are showing because of the excessive shrinking of the resin used. The skiffs that came out like this were sold at a huge discount new in this condition. The skiffs decks are not weak but look funky. But you can see here that they laid the core in carfully and not hodge podge like the previous builder.
A typical HPX scum line at rest with no one aboard. If built lighter.... That is with a conservative skin layup then this skiff would float like the CHITTUM SKIFFS as both designs have the same hull dimensions. The HPX design came first so the guys at CHITTUM Skiffs must have used this hull design as their guide in " Their " vision.
This is a BEAVERTAIL SKIFF hatch. I show this for the details that were not thought out well in advance.
Why have such a huge drain detail if only using a small drain? Hatch liners sure look nice but add the same weight as a properly bulit hatch. That's 2 hatches in one.This is just bling to me.
Now a close up of this same hatch shows they were not thinking when designing this hatches drain gutters. The forward one is too short so they have to cut off the forward hatch lip to be able to open. This is the wettest part of a hatch. Think....before you build.
Just ....think and draw. It's way cheaper in the long run.
Lots of price point skiffs go to the interior liner setup. This is fine if you do not care about having a lightweight skiff to pole around in. liners are used because they are easy to build, install and then hide all the interior work that would have to be faired out and finished properly if looking to save weight.
The problems that you can face with these types of builds is what is going on behind and below this liner over time? You can see this is a new skiff. How are you going to replace the hoses that lead to through hulls that were installed when the deck was off? All is hidden forever....or till the next buyer decides to find out where that continual leak is coming from and tears his skiff apart in the process of tracking it down.
What is silly today is I have a BEAVERTAIL sales brochure here in front of me. I'am looking at the hull weights advertised. 600lbs for this hull and so on. Most any new forklift has a weight scale on it. I like standing next to launch ramp at boat barns and getting skiff weights. It's very informative. Especially when you get several people to sit on the bare forks and record your known weights to verify.
These skiffs must be weighed when the bare hull is coming out of the mold.
A BEAVERTAIL SKIFF today with just 2 guys in it. Not much freeboard left. These skiffs when weighed without people aboard average just under 2,000 lbs. They claim 600 lbs hull weight on the sales brochure so this must mean the hull weight just as it comes out of the mold.
An EAST CAPE hatch setup.
The system that is being used today that is trying to get rid of the hatch draining going through pipes and tubing is worth the effort if thought out well in the initial design phase.
This setup only works if the skiff is never tilted more than an 1/8". It's just like a houses gutter system in that you know your house is never going to lean over and spill all its rain water into your fly tying room.
If the drain gutters went out the side and were angled down and aft it would work better. But you will have to redesign the whole deck to fit this styling.
DRAKE BROTHERS SKIFF
By looking at these drains and the hatches above I would hope they could have longer and deeper hatch edges during the next set of hatches.The gutters are very wide yet those silly hatch latches are inside the hatch area so they will leak into the locket instead of the gutters.
The core edges are sharp. Grind them Into soft curves guys.
They are just getting started so it's a good start here.
The COAST GAURD rating formula for engine Horse Power is a simple one.
This is the rating plaque on a current HB Marquesa.
The system goes like this....
Beam x length = then times 2 then - 90. Then factor up or down on each side of what is left.
SOOO.......
6x 17.10 = 102.6x 2= 205.2- 90 = 115.2...... So it's rating is 115 HP.
NOT 145 hp!
What I see today is very creative salesmanship with COAST GAURD PLATES. I have measured a bunch of my old skiff designs and all their pier group of skiffs using the current CG rules for engine capacity and people loads and so on.
Two different ratings for the same design. I have seen the same skiff design with a 150 hp on the stern and the plaque to go with it.
If your drunk nephew kills himself hitting a dock at night borrowing your skiff along with the people that are with him the Coast Gaurd will look at this plaque and then measure the skiff. If it doesn't match the regulations then you all are in trouble. Owner and seller. Why because lawyers are going to go after who ever has the deepest pockets.
Wow! They are taking lots of risks here to sell skiffs with engines that are TOO big for the rating rules.
Do the math guys!
You all need to design new boats to fit the new loads of bling and the bigger engines.
This is the rating plaque for the MAVERICK HPX skiff. It's accurate. They know what they are doing.
This is a beautiful MARQUESA skiff with just about everything you can have on it today.
Except the console tower steering station, another power pole to match the one that's there, Bimini, and the not fall overboard leaning racks on the towers.
Now you will have to add the 4 people that your plaque says you can at lets be light here at 195 lbs per person. I think without the stuff I added that upper chine will be slapping away in a slight chop with you and your crew.
Why didn't you just buy a bay boat?
That skiff rates for a 115 hp max and 3 people.
He's in the skiff with his wife Diane. This skiff is floating well here and looks great.
A Maverick sitting empty of crew
Here’s Davie Wilson hugging me, Craig Brewer in the background.
So just a few observations from the boatyard the past few weeks. The


