Monday, September 28, 2015

Wild Birds deck project, deck details, and plywood boat rants

Since late May I have been working on Wild Birds deck. She is a 34 year old Trintella 44' ketch built in Holland and designed by Van de Stadt. Tim and Gayle Evans emailed me a year ago asking if I would replace their worn out teak decking in the cockpit and fore cabin deck with new glued on teak. They also wanted all the rest of their flush teak decking removed and fiberglassed over with an Awlgriped finish over the entire deck. This I could do while they went home back to England for the summer.
"Interested?"
Sure! So I sailed from the Bahamas single handed to St Martin where Rachel and our dog Bequia met up with me. (They don't like sailing to weather for days at a time.) Tim and Galyle arrived a few days later having sailed across the Atlantic to meet up with us for a winters adventuring in the Caribbean Sea before they were to leave me with Wild Bird to make her like new. You can see in this blog we have been having fun.
Here's an update with how this project is moving along with some thoughts and observations to go along with it.

First off I will point out that I grew up on a wooden ketch that had caulked teak decks, hatches and teak every where. Teak as a wood is a wonderful natural timber.
But I personally would never own a boat with teak decks. They are super hot to stand on in the tropics.
They collect dirt like crazy. They take daily maintence to keep alive by cleaning them all the time. If they are laid in the tradional manner with caulking to keep out the water they have to stay wet to keep the water out from below. If screwed down then you will have to deal with Thousands of fastening at the very least. All a potential leak. And they are not really that great as a non skid surface unless barefoot.
Now take a modern boat built in plywood with its decks glassed over. No leaks. Now take a molded one piece fiberglass deck. A thing of the utmost in low maintence perfection and then screw at least 2,800 holes into this watertight perfection to add a teak deck to. Total madness.
Read along and see what this madness can and will produce after 34 years of wear and tear.  


Wild Birds teak decks after 34 years of use. She has been sailed all over the place and as the Evans kept her name after purchasing people come along side all the time asking about her.
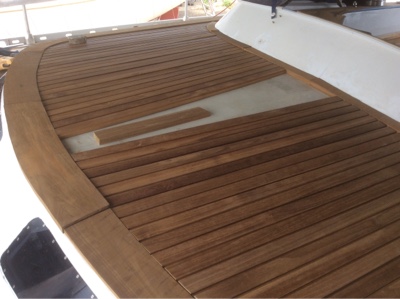
The original teak was about 1/2" thick when new and screwed down with pan head # 10 1-1/14" screws using at least three different types of caulking. The deck was worn down to 3/16" in many areas with screw heads showing all over the place. The black caulking was degraded so far as to leaving black stains on your feet and pants if you sat on the deck.
Years before the previous owners had sailed to Turkey and had the decks seams recaulked in places and refastened in many other places with in some areas doubling the screws in the deck. Madness.
While in the yard in turkey the past owners had all the head liners taken down and all the deck fastenings epoxied over to stop the many leaks in the deck. 
As I removed all the headliners, deck hardware and the teak decking I was to learn of Wild Birds past builders the good, the bad, and the down right ugly.
I started by removing the teak in the cockpit. The lines you see are shallow kerfs I have cut with a skill saw to be able to lift and break off the teak planks easily. Well not so in reality as some were glued down real well while many others just lifted off.
The teak removed with all the old screws holes showing. Each one on this deck project were re drilled out again to clean up the edges for sealing with epoxy putty. The cockpick had gelcoat underneath.
I thought the whole deck would look like this. Not so. 
Cutting out all the new 3/4" thick teak planking that will be glued down with epoxy. Lots of corners and angles here. The round things are lead ballast from the Hogfish to use as weights to hold things in place while laying things out.
Using 1/4" spacers to make sure the teak caulking grooves would be the same and for the 1/4" masking tape that has to go into the bottom of these slots fits.
Gluing down the planking. I used 1-1 epoxy resin thickened with silica. 
Going together.
The black caulk is in place.
Grinding off the caulking and then finish sanding. Satisfying work.
All new. Should last a long time and not a screw hole in sight.
I must admit that the feel of newly sanded teak is very sensuous under foot. Just wish it was not so expensive to buy, install and maintain. Oh yea it's bloody hot in the sun.
The next part I worked on was the foredeck of the cabin top. I expected this to be like the cockpit, just remove the teak and go at it. Not so. The very white spot was the only piece of this trim piece that was sticking.
After removing the teak planks it was revealed underneath a nightmare of bad boat building. The teak was screwed through a thin layer of Matt fiberglass that sat on a thick layer of resin mixed with silica powder about 1/2-3/4" thick. This was between the Airex core. The whole fore cabin was a mess of voids, cracked resin putty and some rotted plywood inside. The cabin top had a 1/2" sagging middle too! What to do?
I removed half the deck down to the core top. The cabin was still sagging and could not be pushed up from inside as when the boat was built it had this sag to start with. Down below all looked fine.
So I replaced the rotten plywood and glassed one half at a time.
Underneath this deck the previous owners had the yard in Turkey epoxy in and over all the leak areas.
What a mess being hidden under and behind the boats liners. Anyone buying a used or new boat should look behind that boats deck liners to get a look at the sins lurking there.
This is not the way to stop a leak! All of these epoxied over bolts had to be chiseled off so I could remove all the deck hardware to glass over the new decks. Most of the major leaks were originally caused by not properly bedding down the deck hardware in the first place. Some hardware had no caulking at all.
After the cabin deck was glassed over with fiberglass cloth and epoxy I glued down this sheet of closed cell core on top to fair out the 1/2" dip and to then fiberglass over again to gain strength by having a double skin cored deck. The teak when glued on top onto a flat straight surface would then make it very stiff.
The deck is fair now.
All glassed over with fairing putty going on. I mixed in glass bubbles to the epoxy resin and spread over the just laid down cloth as it was curing to get a perfect bond. With epoxy the curing times are slower than polyester resin so this is very feasible.
Otherwise you can use peel ply cloth or you will have to sand the resin to get a good secondary bond. I do not trust wiping off the hardened epoxy with alcohol , acetone or vinegar.
Now I'm starting to fit all the covering boards. I counted up 147 different angles to this foredeck teak. The cabin had a nice crown to it so when I bought the teak for this I made sure it was thick so I could grind out the bottom curve to fit the decks crown. When all was glued up I could just then grind and fair the deck to its needed 3/4" thickness. From there I would then caulk the whole deck, let cure and do the final sanding.
Strips- planks going in. What a tedious puzzle this is. You have to secure one side and work from it as when there's epoxy glue underneath the teak it all wants to slide off overboard.
All glued on and caulked. It still has to be sanded and all the edges faired out.
Done. Not a single hole in this area now. It used to bow when you walked over this area but now it's a proper very solid deck.
The next part of the project was removing all the rest of the teak from the decks. This is the stern hatch.
This is the bow hatch. lots of putty and voids under its teak.
The side decks coming off. That's all dirt that was under the teak decking on top of the caulking. A sharp chisel took the caulking up and off. The side decks were worn the thinnest and were the worst for wear. Lots of the foredeck was glued on pretty good but so many of the screws heads were broken off. Took 2-1/2 weeks to get it all off and sanded ready for fiberglass.
Starting on the foredeck. 
When they had built the boat they used a router to final fit the seams. This cut into the deck through out the boat. The yellow stuff is epoxy filler to keep out the rain till I got the deck glassed over. The entire deck was bare glass. This made it easier to sand and prep for the final glass layer. I had to grind out all that black caulking out of thoses grooves though. Luckily for me the days leading up to a couple of tropical storms were coming our way and the wind was strong so I just suited up and all went flying to leeward. That is to the boats stored downwind of WB.
 I know they used a router to cut the seams when the boat was originally built as all these grooves went under all the deck hardware and these had never been removed.
Lots of production boats decks have all their deck hardware attached before the deck is attached to the hull. You can see this on this boat by all the deck bolts that have landed on top of bulkheads and in areas that for me to unbolt I had to cut away parts of the interior. This I have found on many name brand boats that claim to be the utmost in Yacht designs. Just plain BS. Before redoing a teak deck on a yacht I make a deck list to make sure I can get to every piece of hardware. On many boats it's impossible to get to lots of deck hardware without cutting out parts of the interior.
The next step was to glass the decks. Down here at 17 degrees latitude in September the sun is vary hot if shinning directly on you. Put in a few clouds all is well. Better yet a bit of shade with a bit of breeze then all is well for me. With this very thick two part epoxy resin I'am using I could only use a squeegee to spread it out. This was good as by not being very viscous it would fill in all the grooves without running out. What I do is cut all my cloth material to size in advance marking one corner so I know which way is up. I then spread some epoxy down and align my tightly rolled up piece of 7-1/2 oz. cloth down. I then squeegee resin over this. Then I add the next layer on top and squeegee the resin to fill this layer and I roll out a bit more, coat with resin, squeegee and just keep the process up.
This method works well for me in strong winds as the cloth is always under control. If it should start to rain then cut the cloth off and the resin part will cure getting wet. Then come back and start again when dry. 
Here I go... Step by step...
Foredeck has been glassed and puttied over. I'm now putting on my fairing putty as the just laid resin is curing. All cures at the same time. When starting up the next day just grind the edges of where you will be starting to get a good secondary bond. 
Going down the side decks. All the deck was covered with two layers of 7-1/2 oz. cloth. About an 1/8" of skin now covering the 2,800 screw holes that made up the teak deck. I counted the screws.
Now I'm suited up sanding the deck fairing.
New faired deck with an epoxy radius around the old cabin sides where they had the old teak deck butting up to. Will be sanding this all out this week getting ready to paint all the white in a week.
Nothing like no more holes in your deck.
That's not snow ! Deck is all faired off ready for me to do the finishing details. About two pages long of stuff still to do. Wild Bird is a great boat. The rest of the boat is pretty much in plain site. Tim and Gayle have lovingly upgraded lots of this boat over time. The deck underneath was a surprise to us all. The great thing about fiberglass boats is the fact that they can go on forever with the right care. Anything that is going wrong or was not done right the first time can be made better. In a few more weeks it will be like a new boat but better as this deck will now be totally watertight in any kind of weather. I'm glad I got to be a part of making this boat live a long life.
I will post pictures next month of the finished project and will show my time sheet and what it cost to do. 384 hours logged so far.

Now onto some detail ideas on deck hardware and some ranting from me of how bad some boats are in the deck and interior design.

Let the ranting start....

I feel that plywood boats like the Hogfish Maximus have been misaligned for too long. The thinking today is if your boat is built out of plywood you are a cheap skinflint that is willing to live in a continually rotting box. I get so many questions about how I keep the HFM from rotting and falling apart. 
I want all of you that read my rants to just look around you. One of the most successful design brands out there today is the J- Boat franchise. Great boats all. They perform, they cost lots.
They are made out of balsa cored wood, with the thinnest plywood interiors. Basically they are fiberglassed wood incapsulated boats. If you do not fix a leak through the deck or hull of one of these speedsters she will start to rot. Try fixing a rotten balsa core deck or hull. I have had my fair share of doing this. It's a miserable job that you need to get paid well to do. I HATE BALSA CORED BOATS ! The worst things ever. 
But my next job is to fix a big hole in the side of a Mumm 36 that is balsa cored so.... Work to pay for this winters sailing.
Some dyvinycell in the top sides too.

Most all top end Swedish , Danish, Finnish , German, English, American built boats today are built around a balsa cored deck and a totally plywood interior. There is no difference from what they have to deal with than a simple plywood built boat that is well looked after. All the builders will tell you they use the balsa core because of its compressive strength. Yes it has that, but they use it because it is the cheapest thing to buy plain and simple. J-Boats should be using Closed cell core but that would be interfering with their bottom line.
The inside upper sheer on the HFM. All my wiring is lead so it can be seen. The hull side is what you see and feel . So is the deck. No liners at all. Everything can be seen. That round thing behind the wires is an evil eye that was given to me by a Turkish Muslim sailor in Grenada years ago. She had sailed across the Atlantic several times in a 28 footer with it so I keep it close by to look over my shoulder when navigating.
See the sheer? The bolts going through, nothing to hide in my boat.
On a fiberglass built production design everything has to be hidden because they don't have the time to build a proper interior. It would just cost way to much. So when you are buying a Halberg Rassey or some such plywood incased sloop with all its vynel headliners you are in reality buying the cheapest thing in the boat building market. Only one off boats can be built with everything thought out to be seen and delt with at all times. Or worse! You buy a sailboat that has a full Fiberglass headliner. Now you can't track a leak or fix it because it's hidden till you get out the saw.


Most production boats are a Labyrinth of hidden wires, piping and nuts and bolts. All behind a curtain of deceit called a "head liner". That's not Mordor glowing it's just there's no gelcoat on deck and the sunlight is shinning in.
The other day I walked around the deck on the HFM marking and adding up all the fastenings going through her deck and hull. The total was 687. Now subtract the port holes and deck hatches which are not under strain and you will get 454 holes. I plan on making new port holes next year that will have no fastenings. I feel I can eliminate about 200 plus holes from these numbers.
HFM has 5 through hulls or holes going through her hull. The average amount of underwater through bolts and through hulls I counted the other day in the boat yard from Niads, Oysters, and their type was 28-32. Try and keep track of all that when you're in a gale and you're taking on to much water.
Most boats have an automatic bilge pump so don't really know how much their boats are really leaking.
On the HFM we have no bilge pump as we only leak through the prop shaft when motoring.
My Guess on Wild Bird she had at least 3,800 holes in her. Now 2,800 less.
To keep water out of HMF I make these extra pads to bolt down hardware that is under great strain like these running backstay pad eyes and sheet leads. Notice the stern rail stantion base. It has a 1/2" bolt welded in the middle so lots of area for caulking around it.
When installing small under load pad eyes I add these big washers to give a better caulking area. This is the roller furler lead at the bow.
All HFM stantion bases are made out of fiberglass and bolted through the deck set in epoxy glue. When cured the bolt heads are glassed over. Totally watertight and the strongest set up there is except if welded steel.
I bed all my deck hardware using a butel tape that is found when Vacume bagging boats. It is also used in concrete work as a lifetime sealer. This stuff is not Yachty but it stays pliable forever like a just chewed out chewing gum. It's the best for putting around chain plates that go through the deck.

These are few of the things I have done to make maintaining my plywood boat very easy. 
Properly glassed over plywood boats if maintained will last forever. They are very easy to maintain if you are using them. They will not last if left half sunk in a lagoon. 
Most all of the production boats that I sail in company with take way more maintence dollars than HFM. Why , well we don't have as many systems and our boat is very easy to keep clean and running in top condition.
When thinking of your next boat keep it simple so you can be out here sailing most of the time instead of fixing something that was built into the boat years before and now is broken and you will now have to do open boat surgery to repair.
Rants over for now.


1 comment:

Anonymous said...

Thanks for the great blog post - the detail is awesome. I'm headed straight to my boat right now to inspect my awful apendages :)